I'm going to share how I apply my makeup everyday. In this tutorial, I will do a basic look....very minimal. Cosmetics should enhance the feature that God gave you, so less is more. Makeup should be about the colors you choose and where you put them, not how much you put on.
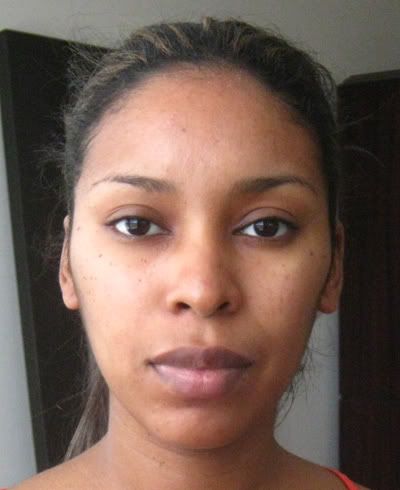
Normally, only my husband gets to see this "Before" face, but I will share it with you all for the sake of beauty. Here is what I want to accomplish: (Don't laugh)
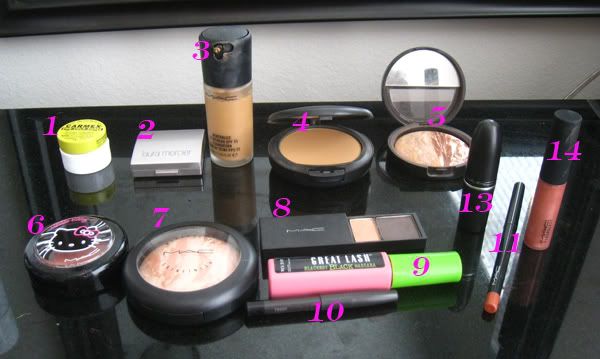
Here are all the products and tools I used. You don't have to use the same ones. Use what works for you.

1. Carmex - to soften the lips.
1.(a) Not pictured. Hope in a Jar Moisturizer (all over face)
1.(b) Not pictured. Smashbox Photofinish Primer
2. Laura Mercier Secret Concealer #4
3. Mac MSF liquid foundation NC45
4. Mac Studio Fix NC43
5. Laura Geller Balance and Bronze
6. Mac Hello Kitty Beauty Powder Blush - Fun and Games
7. Mac MSF Refined
8. Mac Brow Shader
9. Maybelline Great Lash Blackest Black Mascara
10. Mac Ebony Eye Pencil (not the best - always bleeds on me)
11. Mac Creamstick Pearl Liner - Sherry
12. Whoops....nothing here :|
13. Mac Shy Girl Lipstick
14. Mac Plushglass - Big Baby

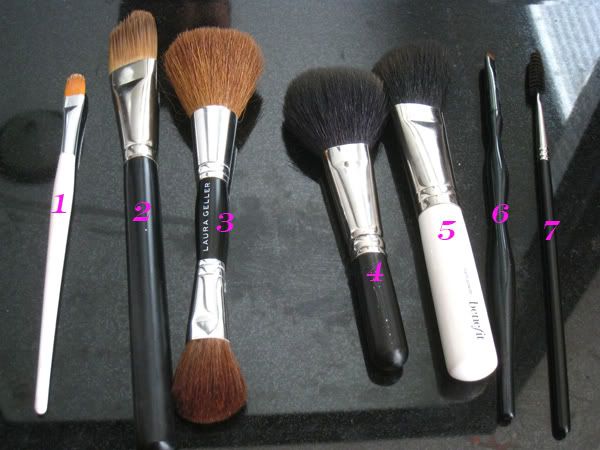
1. Sonia Kashuk Concealer Brush (Target)
2. Mac 190
3. Laura Geller dual brush
4. Mac 129
5. Benefit Slant Powder brush
6. Smudger brush (not sure of name - got it from Target)
7. Mac 263
Step 1: Moisturize lips and face. Add face primer. Face primer is optional. I use it to make my makeup last all day. I have very oily skin, so if I don't, my face will look like an oil slick midday.
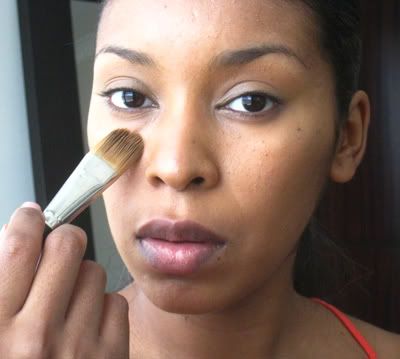
Step2: Conceal any blemishes and dark spots. I usually have dark circles under my eyes, so I try to lighten that area up with concealer. I applied it with a brush and blended with my ring finger using light taps.
Step 3: Apply foundation all over face. Be sure to get into the hairline, otherwise, you'll look like you have a ring around your face. To prevent applying too much foundation, I pumped two small amounts onto my wrist and used that to cover the entire face.
I used a foundation brush to apply. You can easily use your fingers (great method because the heat from your fingers helps the foundation blend well), or a sponge.
To ensure the foundation is even, I buffed it with a flat foundation brush. You can also even it out with a wedge sponge.
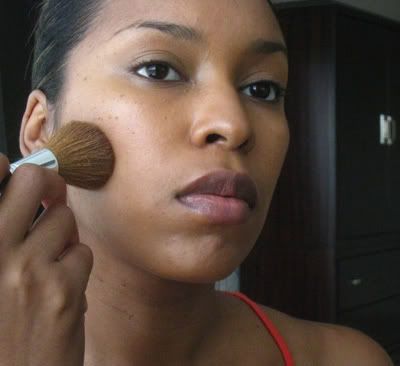
Step 4: Set the foundation with powder. I used Mac Studio Fix powder with brush 129. This will help the foundation stay and not look so shiny.
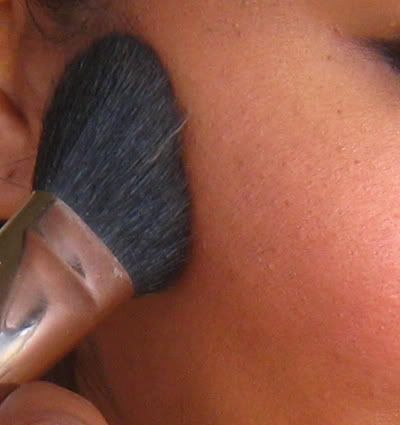
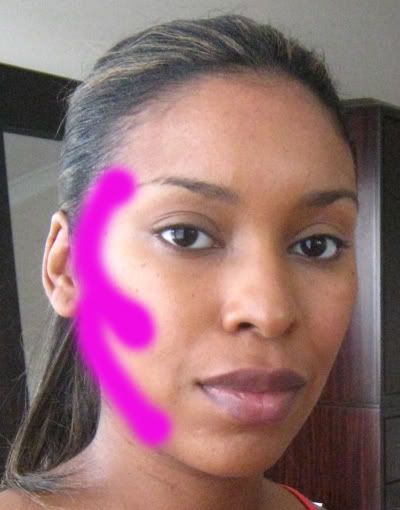
Step 5: Apply bronzer. I used my bronzer to contour my face. This helps bring out my cheekbones, slims the face a bit (I'm 6 months pregnant ;), and adds a natural glow.

Take your brush and create a number 3 shape starting from the temples, cheekbones, and chin.
 Step 6:
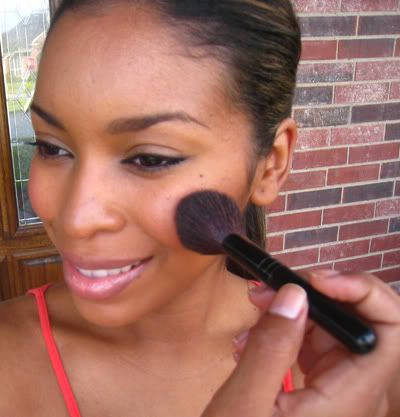
 Apply blush. Every gal needs a little blush. Don't be scaaared :)! I was nervous about blush at first myself, but it really makes the difference. Just find one that is natural and neutral, but still adds life to your skin. If you want natural, look at your cheeks after working out. What is the natural color?
I applied a very light peachy blush to the apples of my cheeks and blended downward into the bronzer. To give it a bit more radiant glow, I applied Mineralized Skinfinish on top of the blush.
 Step 7:
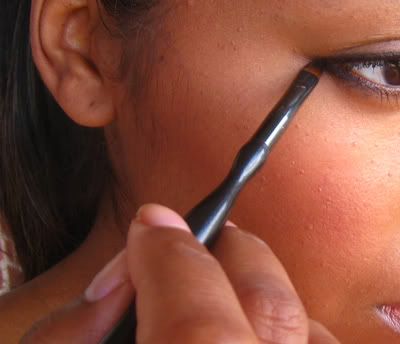
 Line eyes (optional). Add mascara (a must!!). I only line the outer corners of my eyes and smudged it a bit. Two coats of mascara. Both coats should be very light. Wipe off excess product from the wand before applying to lashes, otherwise, you'll have clumps. Let the first coat dry before adding the second.
 Step 8:
 Lips. I wanted a very light look, but with a little life, so I used a peachy color to match the cheeks.
My lips are pretty dark, so I line them with a light peach liner and filled in the entire lip. Next Applied lipstick and gloss.
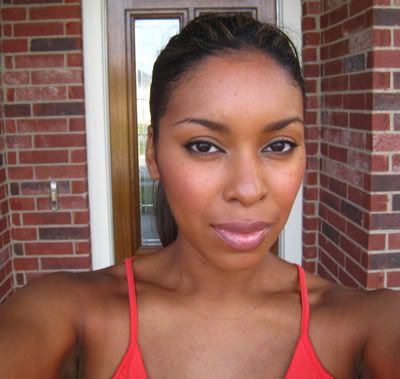
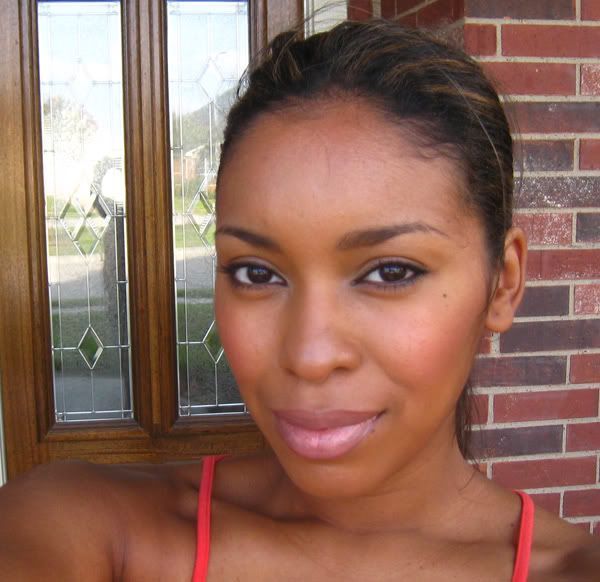
Voila!!! We're done. Adorn your true beauty! It only takes a few steps.

 Here is what they look like on my arm. I am NC43-45: